


Daily Timers are the timers that have a real time clock in built. Hence, you can set the actual clock time at which you want your lighting load to turn ON and OFF. The daily times have a 4 digit led display that always indicate the current clock time. There will be a battery inside to keep the clock running even in case of a power failure. The daily timers offer a provision to set up-to 8 different ON and OFF timings for the motor load. The user can choose the number of times it has to be kept running. The provision is also given to adjust the system clock.
Features:
- Built in Real time clock
- User adjustable ON Time and OFF Times
- Up to 8 different time settings
- Built in clock time adjustment feature
- Compatible with all types of Single Phase monoblock motors
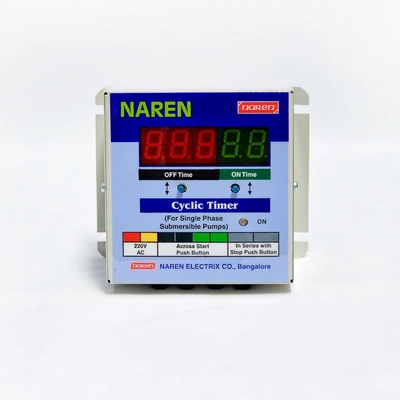
- Power ON and OFF switch
- Digital 4 digit LED Display
- Motor Running Indication
- Wire type design
- Used in hydroponics, horticulture
Rating:
- Available in 3 variants
- Up to 4000W
- Up to 5000W
- Up to 7000W
Connections:
- Connect the first set of Red and Black wires to incoming Single Phase (220V AC) power supply
- Connect the second set of Red and Black wires to the lighting load
Operation:
- The timer display powers up as soon as the power supply is ON. The timer displays the present clock timing on the display always. The motor load is turned ON as soon as the timings hit the set ON time and the motor load is turned OFF once the present time is up. The timer will continue to display the present time throughout. The motor load is turned ON subsequently on every clock duration.
Technical Specifications:
- Minimum operating Voltage 150V
- Maximum operating voltage 250V
Settings:
Setting the timings:
- The timings are categorised as ON1, OFF1, ON2, OFF2…..till ON8, OFF8.
- ON1 - OFF1 are the first ON and OFF timings. ON2 - OFF2 are the second timings and so on. If you wish to set only a few timings, you can enter only desired times and leave the rest unentered.
Follow the below steps to set timings:
- It is advisable to clear all the previously set times initially.
- Press and hold the set button till you see END on the display to clear all previously set timings.
- To set the timings, Press the set button
- The display reads ON1 and the time display continues.
- The format of display is in HH:MM
- Press the increase button on the right to increase the timings
- Press the decrease button on the left to decrease the timings
- Arrive at the desired time and press the Set button.
- The display then reads OFF1 and the time display continues.
- Press the increase button on the right to increase the timings
- Press the decrease button on the left to decrease the timings
- Arrive at the desired time and press the Set button.
- You will next see the display showing ON2 and the time display continues.
- If you wish to enter the second time slot, then enter the readings. Else, wait for 10 seconds till you see end on the display
- You can enter how many ever time slots among 8 and wait on the ON setting of the next slot to save and come out of the settings.
- To cross check the set times, press set again and the previously adjusted timings will be shown against the particular time. You can verify the settings.
To adjust the clock timings:
- Press all the 3 buttons on the device
- The display reads “time” and then displays the set time.
- Press the increase button on the right to increase the timings
- Press the decrease button on the left to decrease the timings
- Arrive at the desired time and press the Set button.
- To verify, see the current time is the same time set by the user.
Application:
- Poultries
- Horticulture
- Hydroponics
- Commercial Complexes
Warranty:
- This product carries a warranty of 6 months from the date of purchase. Any issues within the warranty period will be attended to free of cost at our works in Bangalore. Post the warranty period, the product will be eligible for the paid service at our works. The invoice copy acts as a warranty card. The shipping of the product for repair will have to be done by the consumer.
